通过API Hooking获取BCTextEncoder解密密码
BCTextEncoder是一款对文本信息加密的软件,支持使用公钥和密码方式对内容加密。
API Hooking技术通过替换/重定向原有程序的API调用,可以实现对程序的进一步控制。
本文将详细讲解通过API Hooking方式获取BCTextEncoder的解密密码,作为自我学习的一种信息记录。
文章主要参考的文章写于2019年末、2020年初,据现在(2024年)已有4年之久,让我感到汗流浃背。
API Hooking技术
API Hooking技术介绍
我主要通过如下文章了解API Hooking相关知识:
- Red Team Notes: API Monitoring and Hooking for Offensive Tooling
- Rio Sherri: RdpThief: Extracting Clear-text Credentials from Remote Desktop Clients
- Ariasaka: 运用 Windows 的 Hook 淦极域 && MinHook 入门教程
其中前两篇文章介绍了通过API Hooking方式获取RDP会话的主机名、用户名、密码的过程,本文的大部分流程都涵盖在其中,本文更侧重于信息记录、避免后续重复踩坑。
第三篇文章是一位10后的文章,里面详细摘录了Windows API Hooking的相关说明和利用MinHook对抗极域软件的例子。与这篇文章不同的是,本文及前面文章均采用微软的Detours库进行API Hooking编程。
通过MessageBox函数初次尝试API Hooking
为了能顺利使用Detours库进行API Hooking,需要引用detours.h头文件和detours.lib库。
对应在Detours库Wiki的Using Detours文章:
The code fragment in Figure 5 illustrates the usage of the Detours library. User code must include the
detours.hheader file and link with thedetours.liblibrary.
我们使用前面RdpThief文章的示例代码进行MessageBox函数的API Hooking尝试。
在Visual Studio 2022中新建C++ Console APP项目: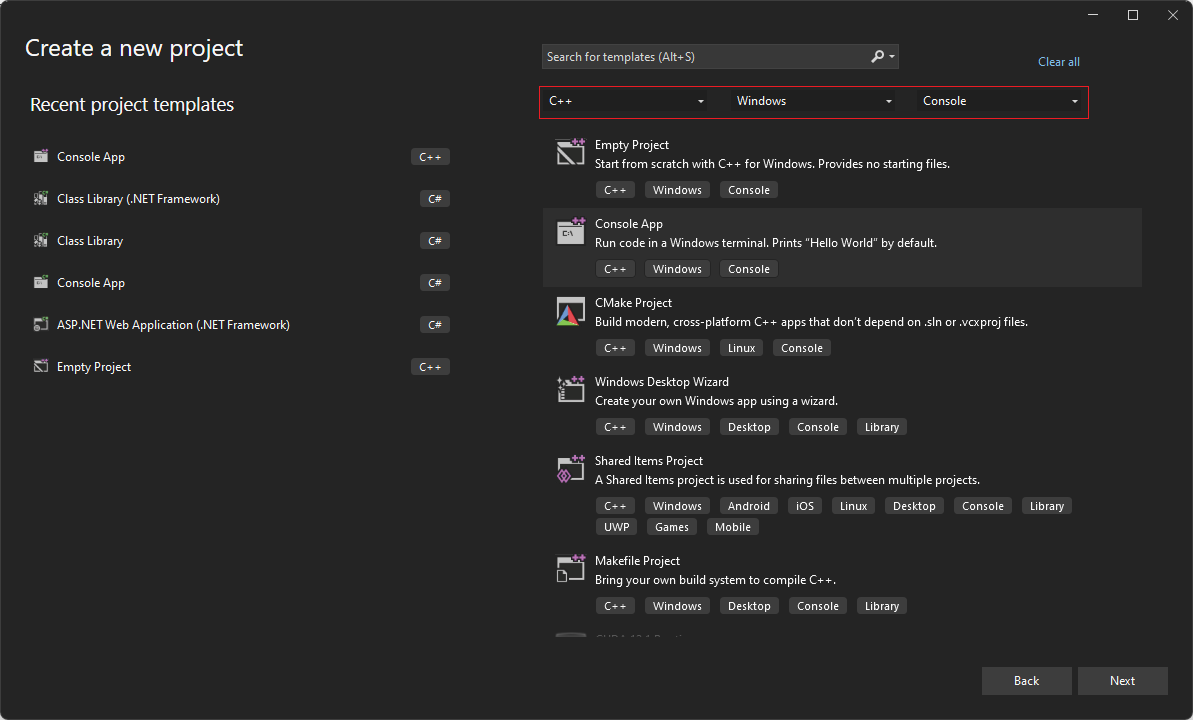
设置项目平台为x86:
从RdpThief文章中复制代码,并进行一些小调整: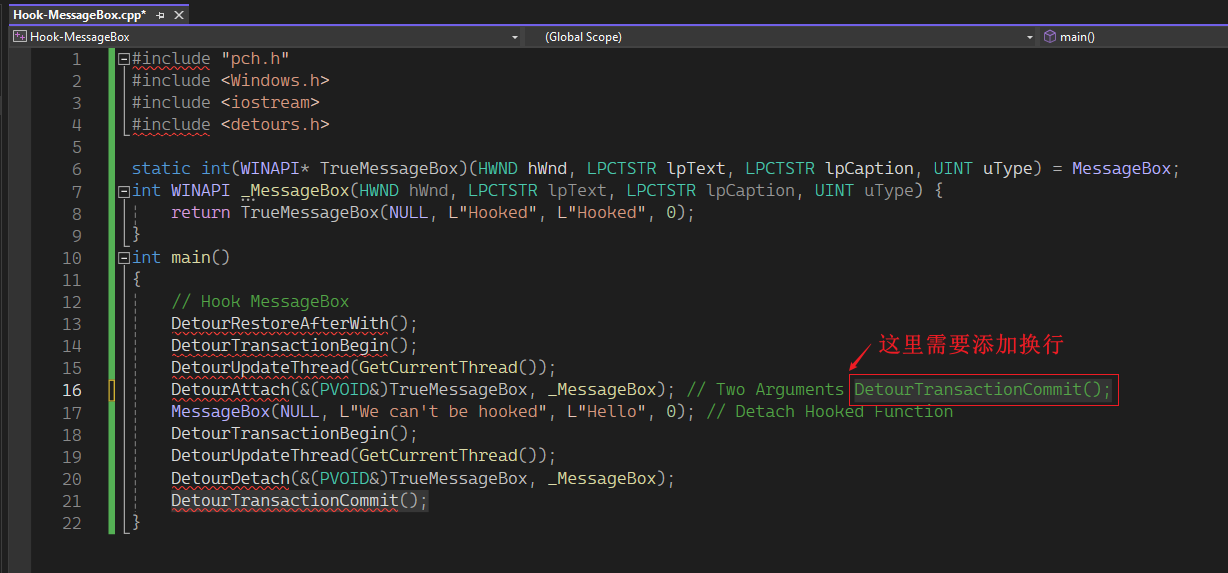
并删除首行的#include "pch.h",关于pch.h可以参考这个链接:What is “pch.h” and why is it needed to be included as the first header file?。
在项目属性中添加detours.lib库: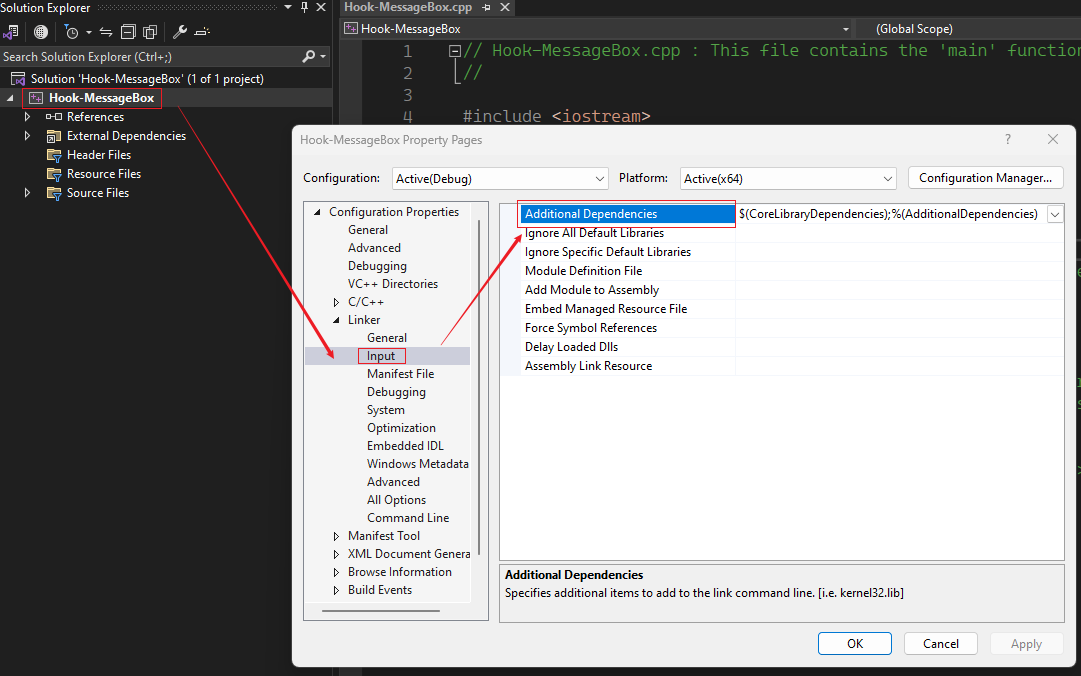
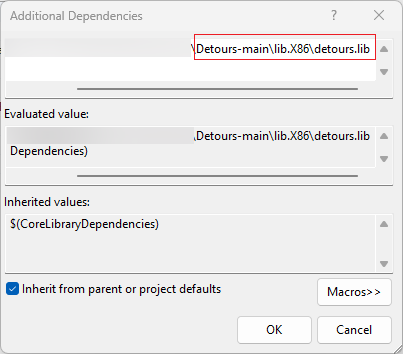
注:1、该文件需要自行编译,编译步骤见Where can I find detours.lib and detours.h?,建议在Visual Studio中编译;2、因为BCTextEncoder为x86版本,本文全程使用x86版本环境。
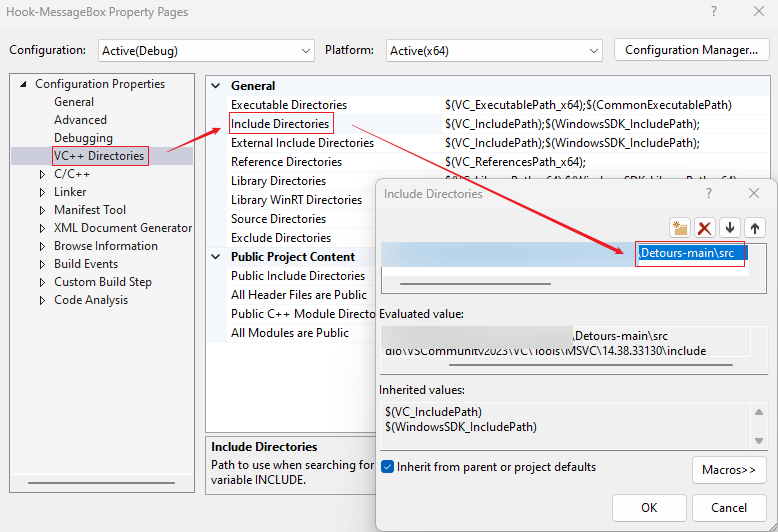
添加detours.h头文件,在项目属性中添加包含文件夹: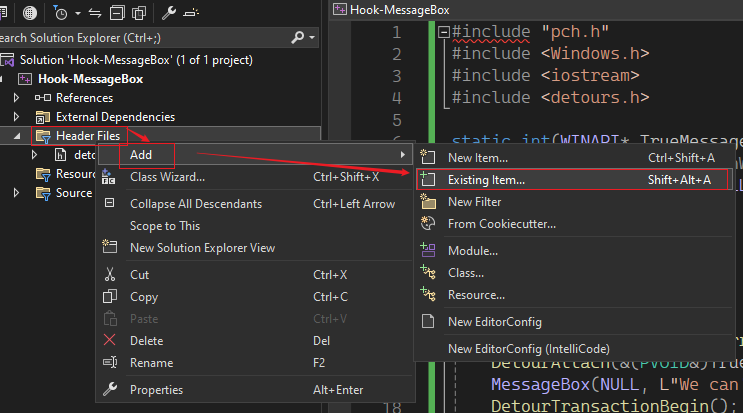
点击运行按钮,弹窗显示内容为API Hooking修改之后的内容,证明API Hooking成功。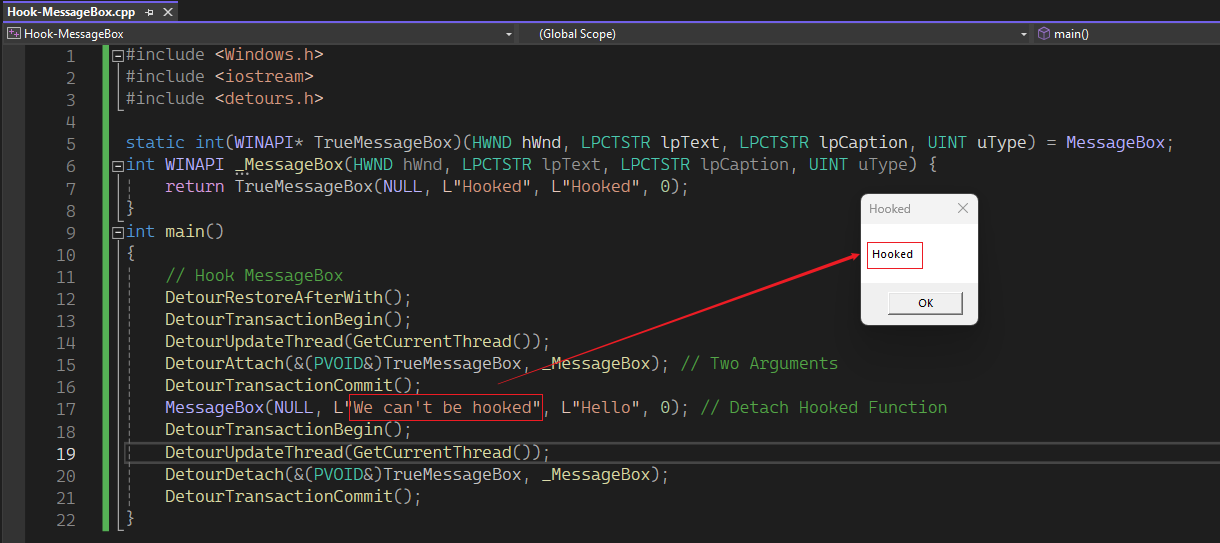
API Hooking获取BCTextEncoder解密密码完整流程
学习Red Team Notes: API Monitoring and Hooking for Offensive Tooling和Rio Sherri: RdpThief: Extracting Clear-text Credentials from Remote Desktop Clients的文章和个人测试,我个人总结使用DLL注入方式对某个应用程序进行API Hooking的步骤是:
- 找出需要Hooking的API
- [可选]通过调试器确认需要Hooking的API
- 编写API Hooking代码
- 测试DLL注入
找出需要Hooking的API
通过API Monitor来寻找需要的API。API Monitor提供x86和x64两个版本的可执行文件,分别对应不同版本的可执行文件。
在任务管理中,详细信息页中在表格标题栏右键选择查看列,勾选Platform即可查看应用程序对应的版本。
“解铃还须系铃人”,为了更好地获取解密密码,我们需要先了解程序日常使用情况。
使用SecurePassw0rd!!加密文本消息Hack the Planet!,得到的密文信息如下:
-----BEGIN ENCODED MESSAGE----- |
运行合适版本的API Monitor程序,将左上角的API Filter的所有类别全部勾选上;双击左下角需要监测的程序进程,这些进程会添加到Monitored Process中。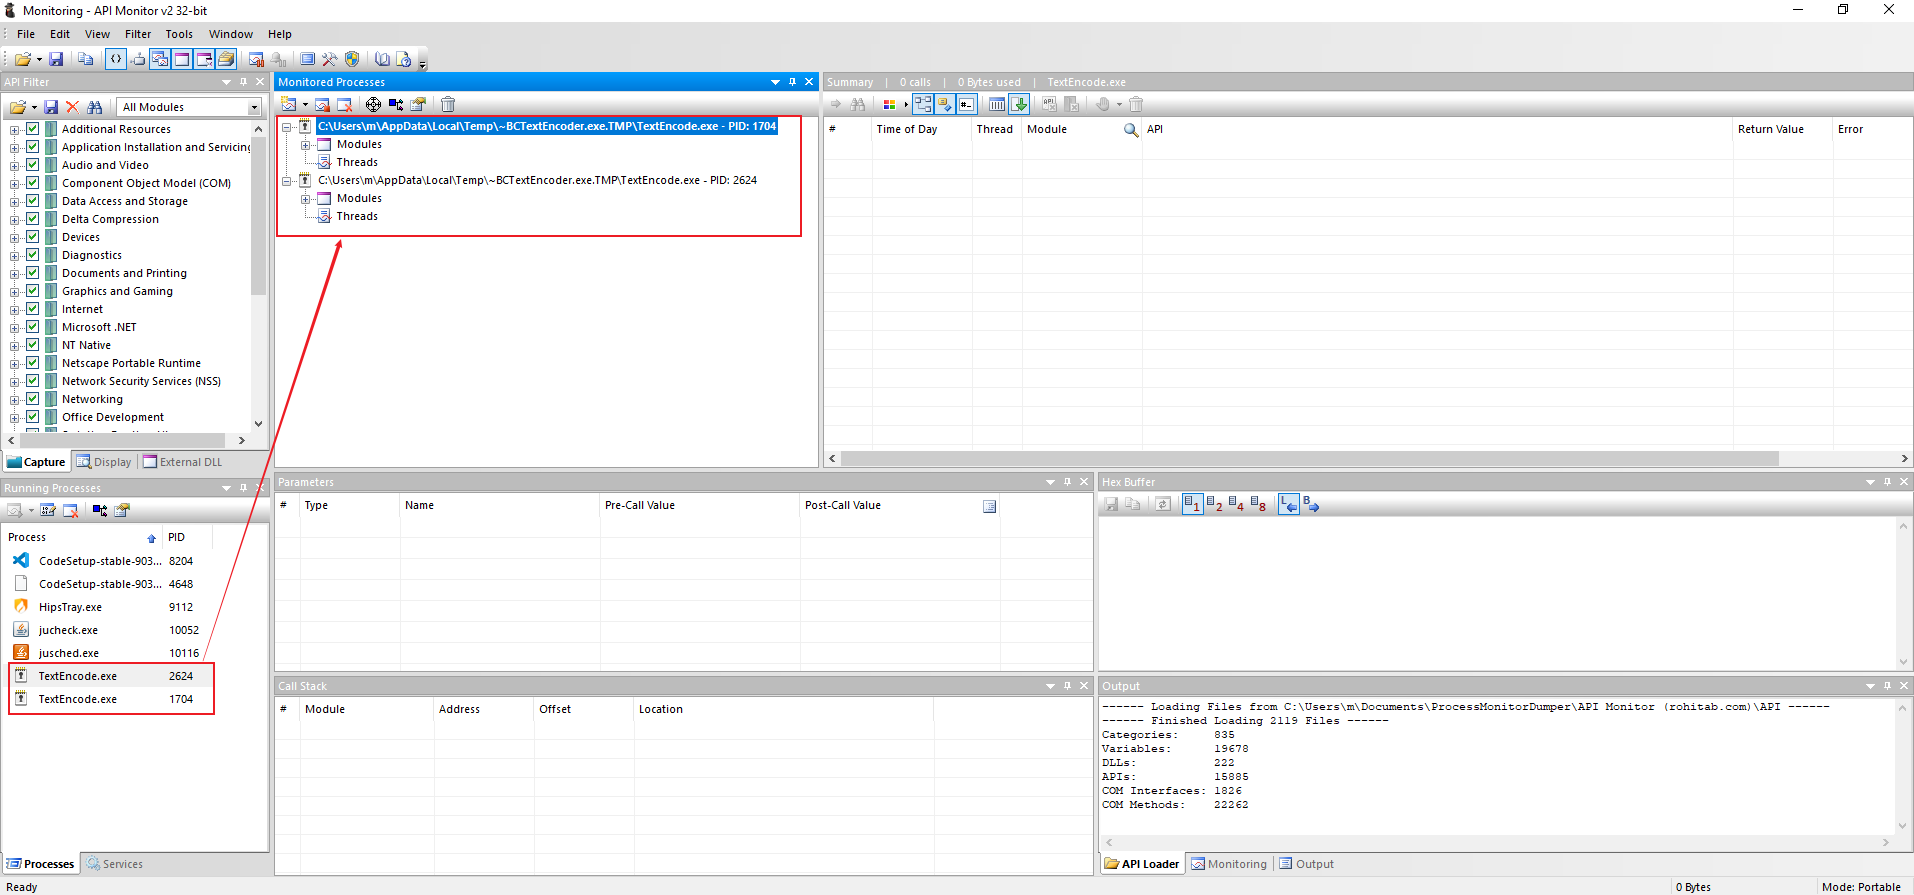
在监测开启的情况下,按正常使用场景,对加密的文本内容进行解码。此时API Monitor的Summary窗口会有大量的API调用记录信息。(注:使用API Monitor时,不建议使用类似“打开文件”功能,调出文件管理器的过程会有大量的API调用,导致系统卡死。)
在不同线程的API信息中搜索解密密码SecurePassw0rd!!,可以查找到对应记录: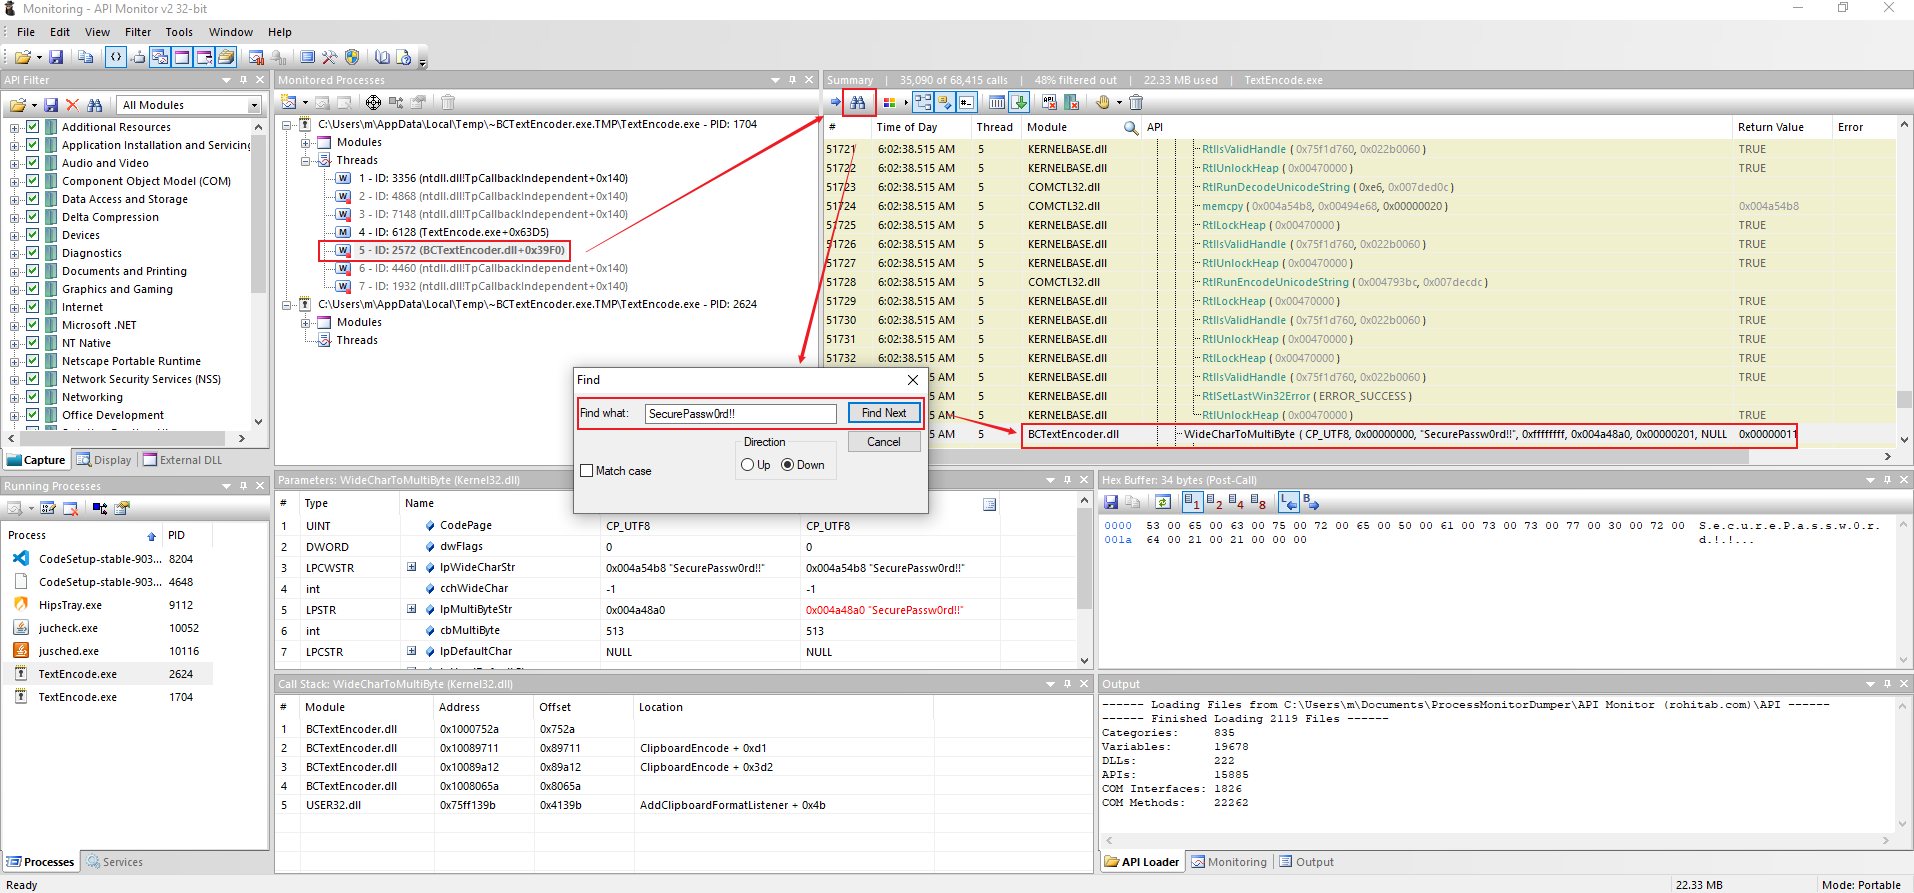
我们在API调用中发现了解密密码明文,对应的API信息为:WideCharToMultiByte,将鼠标悬停在API名称上时可以看到API对应的dll信息。(注:这个信息可以作为调试时下断点的参考,但也不一定准确。)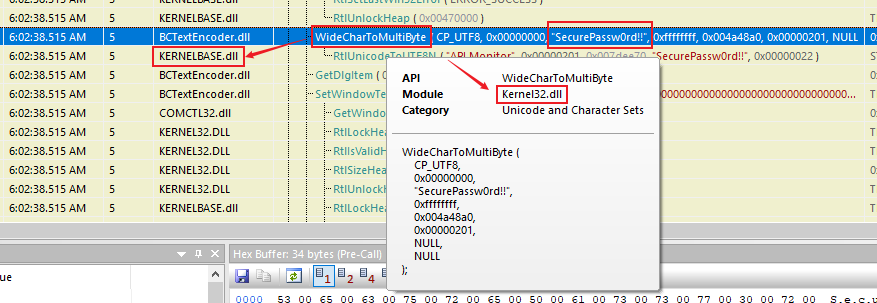
[可选]通过调试器确认需要Hooking的API
使用WinDBG对程序进行调试。
经过我实践认为,调试附加在哪个进程很重要,有点类似于API Monitor对Threads的选择,这一点在后续进行DLL注入及编写CobaltStrike的cna脚本中也有体现。
使用Process Hacker观测、判断实际解密动作对应的进程。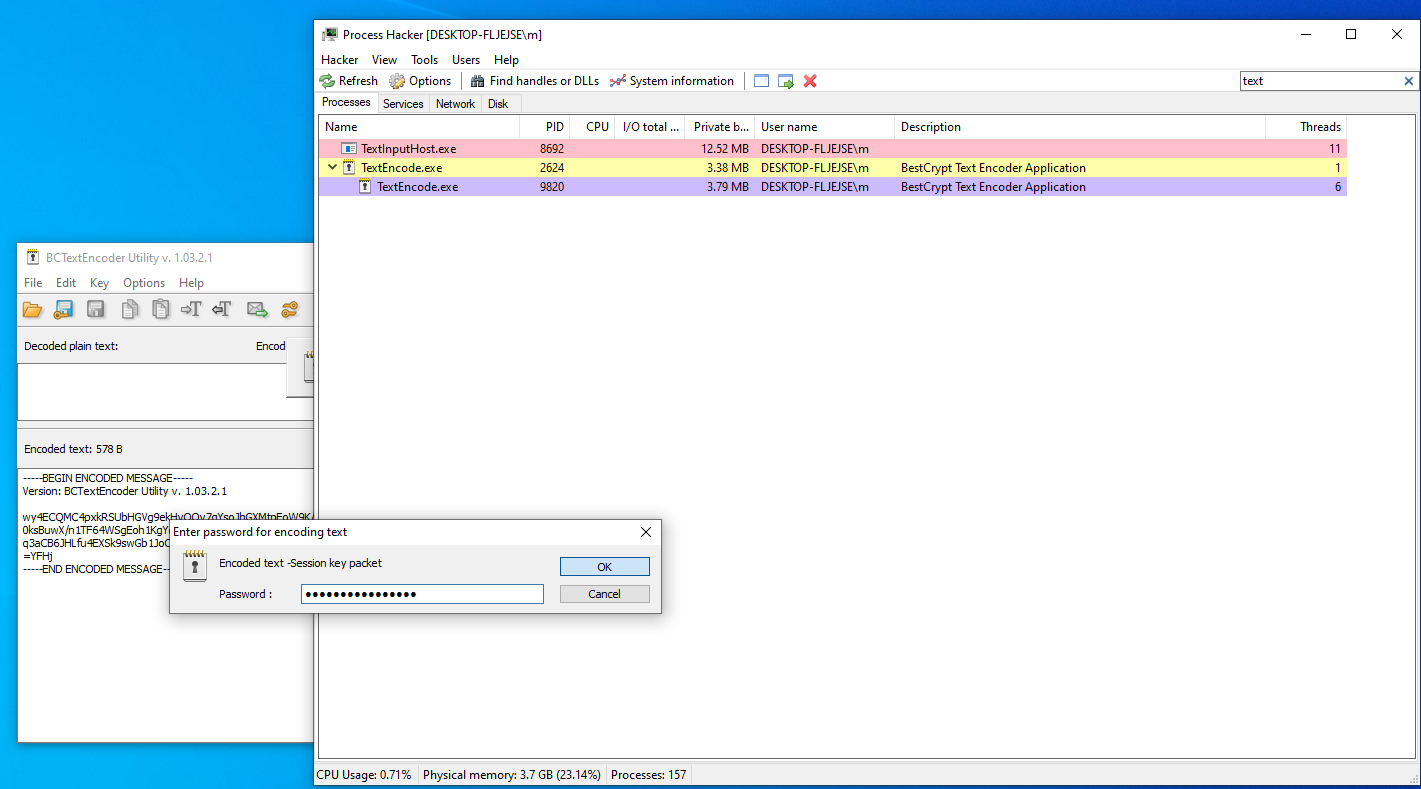
使用WinDBG附加到对应进程: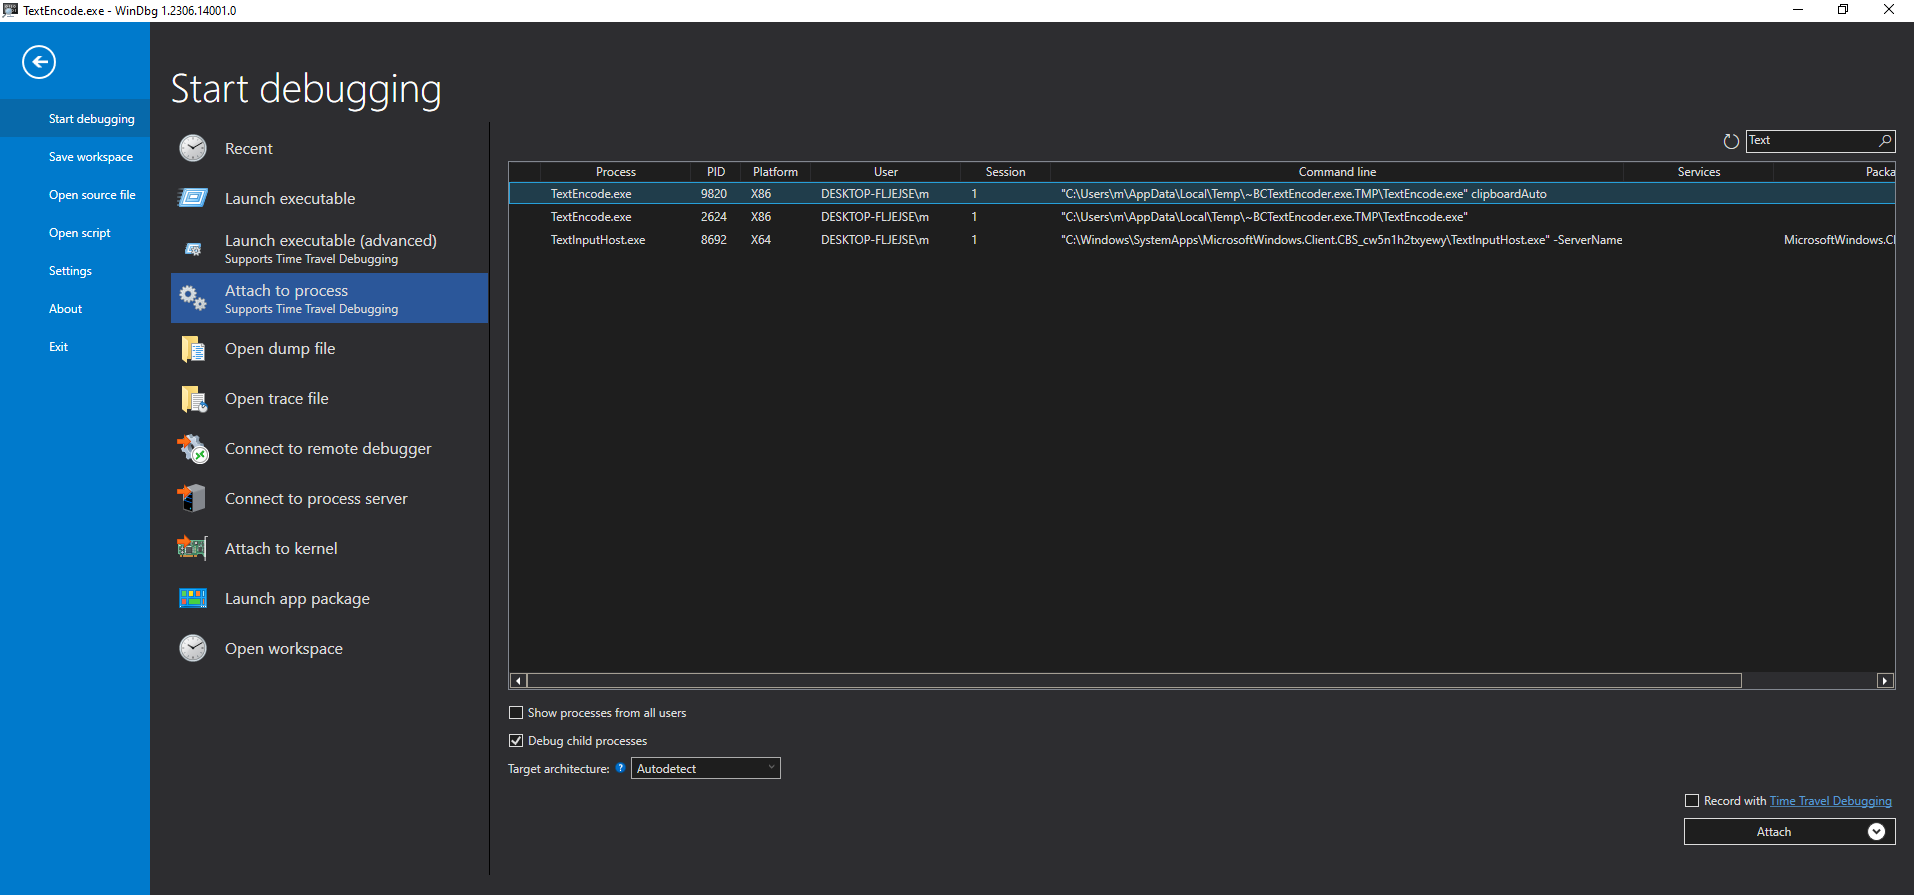
在命令窗口输入bp kernelbase!WideCharToMultiByte "du @ecx"下断点,断点触发自动打印ECX寄存器值: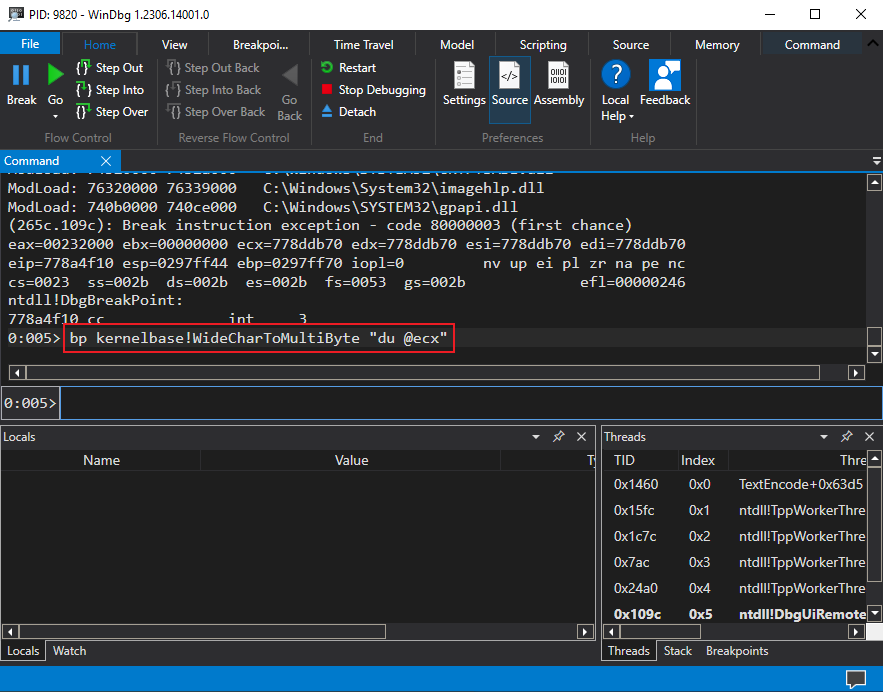
输入g让程序接着运行;切换到BCTextEncoder程序,输入密码完成解密过程:
可以看到确实打印了密码。
编写API Hooking代码
API Hooking部分代码基于RdpThief修改得来,主要改动点是修改了Hook的API函数、记录内容。
按Using Detours的说明:
Two things are necessary in order to detour a target function: a target pointer containing the address of the target function and a detour function. For proper interception the target function, detour function, and the target pointer must have exactly the same call signature including number of arguments and calling convention. Using the same calling convention insures that registers will be properly preserved and that the stack will be properly aligned between detour and target functions.
用Copilot翻译:为了绕过一个目标函数,需要两件事:一个包含目标函数地址的目标指针和一个绕过函数。为了正确地拦截目标函数,目标函数、绕过函数和目标指针必须有完全相同的调用签名,包括参数个数和调用约定。使用相同的调用约定保证了寄存器会被正确地保存,以及绕过函数和目标函数之间的栈会被正确地对齐。
前面已经知道要绕过的函数是WideCharToMultiByte,查阅微软文档,该函数定义如下:
int WideCharToMultiByte( |
对应的API Hooking改写代码如下:
static int(WINAPI* TrueWideCharToMultiByte)(UINT CodePage, DWORD dwFlags, _In_NLS_string_(cchWideChar)LPCWCH lpWideCharStr, int cchWideChar, LPSTR lpMultiByteStr, int cbMultiByte, LPCCH lpDefaultChar, LPBOOL lpUsedDefaultChar) = WideCharToMultiByte; |
上述代码中TrueWideCharToMultiByte是真实WideCharToMultiByte函数的指针,而_WideCharToMultiByte是用来替换WideCharToMultiByte的函数,将其接收到的参数全部传递给真实的WideCharToMultiByte函数,保证程序正常功能,此外在传递前会调用WriteCredentials函数完成解密密码信息的记录。
完整代码如下:
|
测试DLL注入
使用Process Hacker将编译得到的DLL文件注入到BCTextEncoder进程中。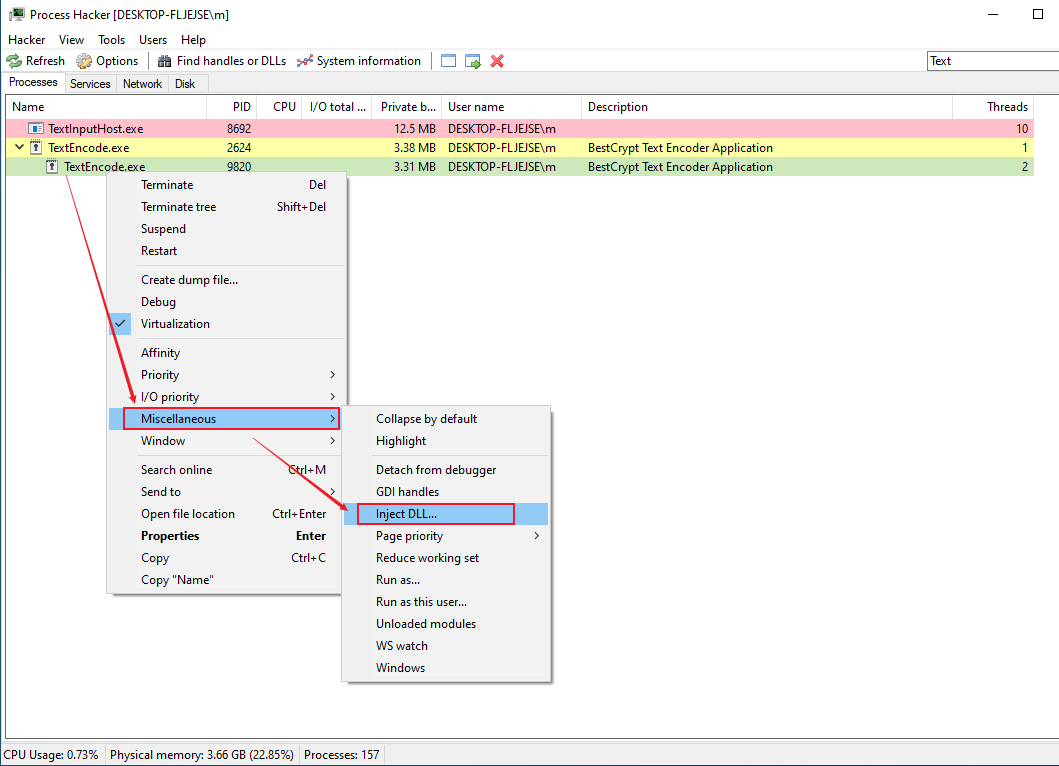
测试解密文件,可以发现密码自动记录在%TEMP%\data.bin文件中。
后渗透中DLL注入
手工注入
实际在靶机测试过程中,肯定不会有图形化界面让我们来运行Process Hacker用图形化方式注入进程。
这时可以使用Metasploit的post/windows/manage/reflective_dll_inject进行注入:
msf6 post(windows/manage/reflective_dll_inject) > show options |
使用MSF框架不方便之处在于需要手工切换到meterpreter会话中查看对应进程的PID,然后返回到msfconsole界面设置,实际场景下从输密码线程开始到结束时间很短,手动执行DLL注入基本不现实。
同样的情况还有PowerSploit的Invoke-dllinjection模块。
编写Cobalt Strike的.cna脚本实现自动化进程注入
在RdpThief项目中,作者提供了RdpThief.cna文件,用于Cobalt Strike会话中自动注入mstsc进程。
在Cobalt Strike中注入的不是DLL,而是Shellcode,需要使用sRDI - Shellcode Reflective DLL Injection进行转换。
我参照该文件和CobaltStrike手册及Sleep语法,完成了对BCTextEncoder进程的自动注入,实现效果如下:
相关代码文件可在Github下载,项目名称为BCTextEncoder-Thief。